
Acrylic Display Tray: Custom Manufacturing & Production Guide

Bob Chow Bob
Share:

Article Overview

An acrylic display tray may look like one of the simple […]

An acrylic display tray may look like one of the simpler fixtures in a retail environment. But once a custom tray moves from an approved drawing or sample into production, small details start to matter.

The tray needs to fit the products, work within the available retail space, hold its shape, match the approved branding, and arrive without visible surface damage. With glossy acrylic in particular, scratches, fingerprints, dust, poor edge finishing, or inconsistent graphics can quickly affect the final appearance.

The real challenge is not making one good-looking sample. It is producing the same result consistently across the full production run.

This guide explains what buyers should consider when manufacturing a custom acrylic display tray, from dimensions and acrylic specifications to machining, edge finishing, branding, quality control, and packing. We will also look at a real glossy black acrylic tray project to show where seemingly simple production details can become important.

If you already have a drawing, artwork, reference image, product layout, or approved concept and need to move it into production, the sections below will help you know what to confirm before mass production begins.

What Is an Acrylic Display Tray?

An acrylic display tray is commonly used to organize and present cosmetics, nail polish, skincare, jewelry, and other small retail products. For brands that need a custom acrylic display tray rather than an off-the-shelf product, the challenge is not simply choosing a size or color. The tray has to move from an approved drawing, artwork, or reference sample into repeatable production.

Unlike a general countertop display, which can include risers, holders, bins, tiered stands, and other structures, a display tray normally uses a shallow open format. Depending on the merchandising requirement, it may also include dividers, slots, inserts, raised sections, or branded panels.

Acrylic works well for this type of fixture because it can be produced in clear, white, black, frosted, glossy, matte, and other finishes while keeping the structure relatively clean and compact.

The tray itself may be simple. Choosing the right specification is not always as simple.

Where Are Acrylic Display Trays Used?

Acrylic display trays are commonly used for cosmetics, nail polish, skincare, perfume, jewelry, accessories, and other small retail products.

The same basic tray format can work very differently depending on what goes inside it. Nail polish may require clear SKU organization and easy product access, while jewelry may need more spacing and a cleaner presentation. A beauty counter may also require the branding to remain visible even when the tray is filled with products.

The right tray therefore depends not only on the product category, but also on SKU count, product visibility, available space, product access, and how the tray fits into the wider merchandising layout.

Product Type Typical Tray Configuration Main Consideration
Nail polish / cosmetics Shallow tray / divided tray SKU organization and access
Skincare / perfume Tray with riser or insert Product visibility
Jewelry / accessories Compartment or presentation tray Product spacing and presentation
Small retail goods Open tray / divided tray Capacity and accessibility

For beauty products, for example, a shallow branded acrylic tray can keep multiple products organized while leaving the front branding visible at counter level.

Once the basic tray format is confirmed, the next step is to make sure the specification can actually be produced consistently.

What to Consider Before Manufacturing an Acrylic Display Tray

Product Size, Capacity and Tray Footprint

Start with the products.

Confirm their dimensions, weight, quantity, and how they need to sit inside the tray. Also check the available counter, shelf, or display area.

These factors determine the tray width and depth, product spacing, divider positions, and internal structure. A tray designed around approximate product dimensions may look correct in a drawing but create fit or accessibility problems when the actual products are placed inside.

These details should therefore be confirmed before the material specification is finalized.

Acrylic Thickness, Color and Surface Finish

There is no single acrylic thickness that works for every display tray.

The appropriate specification depends on the overall tray size, unsupported spans, product load, structure, and required rigidity. Using thicker acrylic does not automatically make a better tray; the thickness needs to work with the structure.
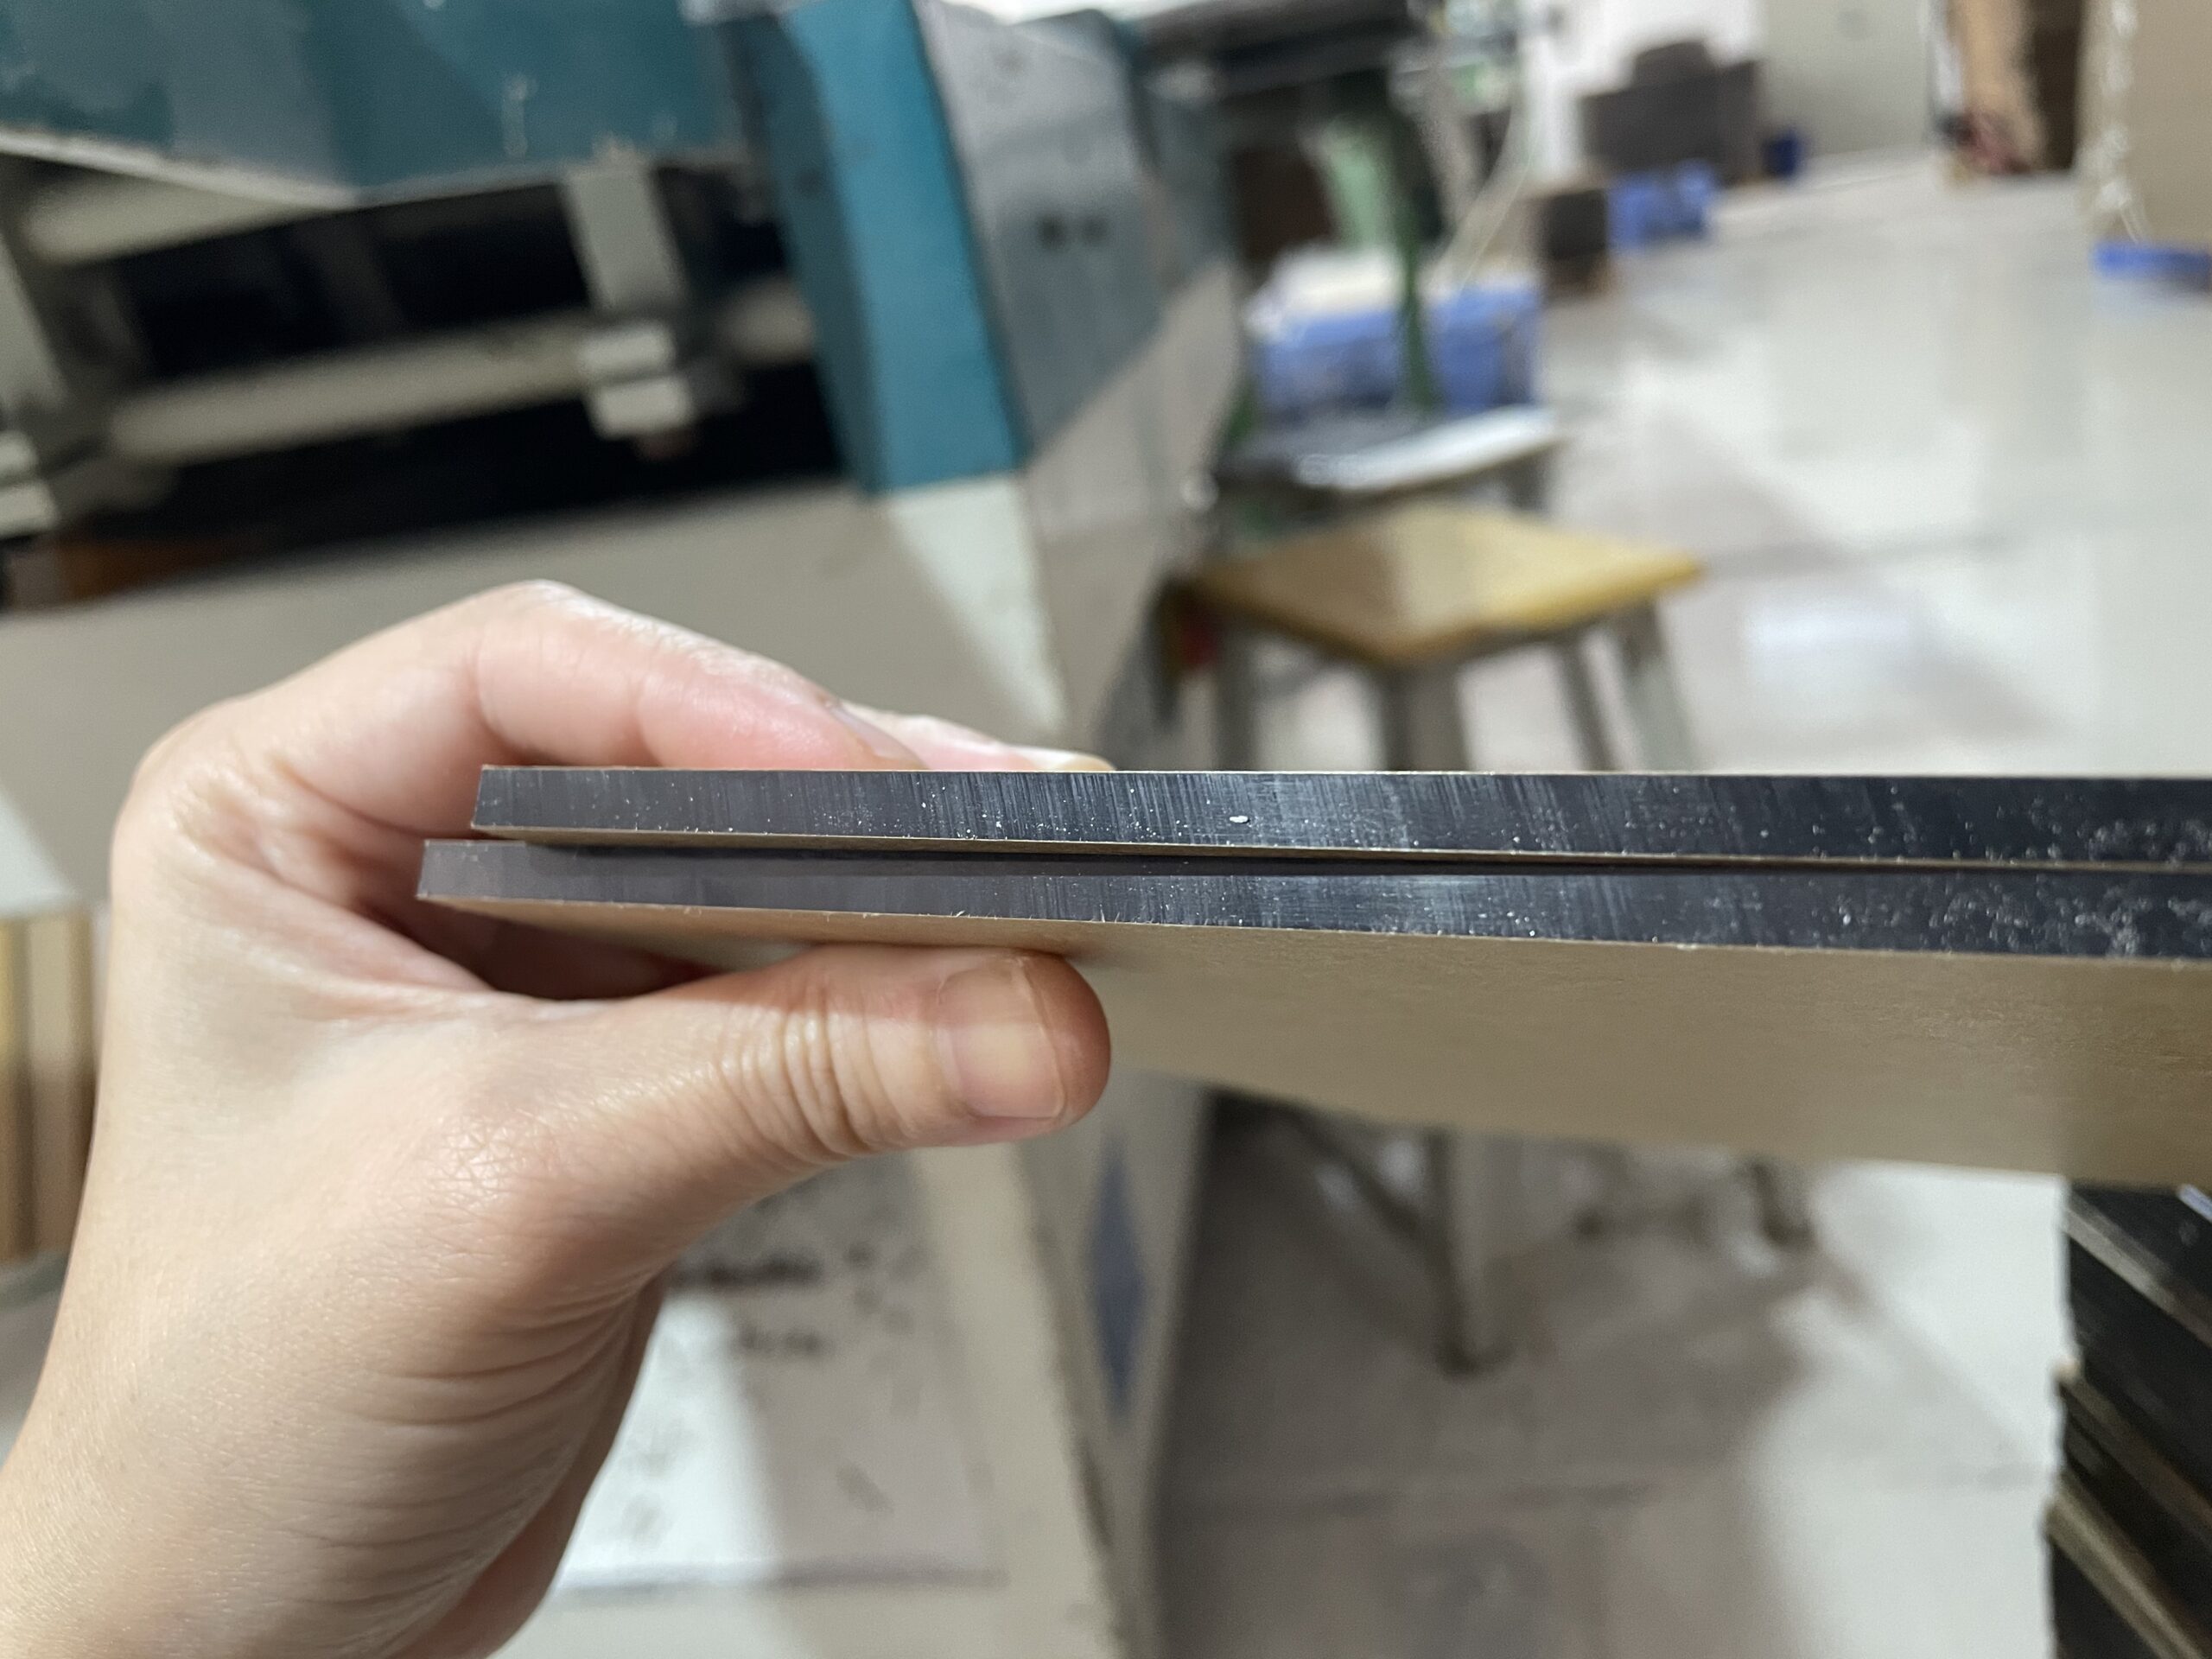
Close-up comparison of black acrylic sheet thicknesses for retail display production

Color and finish also affect more than appearance.

Clear acrylic creates a light visual effect, while white or black acrylic can give the tray a stronger branded presence. Matte and frosted finishes behave differently from glossy surfaces during handling and inspection.

For example, glossy black acrylic can create strong contrast with white branding and give a clean retail appearance. But scratches, fingerprints, dust, and polishing marks are also easier to notice on a dark glossy surface.

That makes surface handling important throughout production—not just during the final inspection.

Branding and Product Organization

Logo size, position, artwork, and the required branding area should be confirmed before production.

Depending on the project, branding may be applied using screen printing, UV printing, vinyl graphics, engraving, or applied branding elements. The appropriate method depends on the artwork, acrylic finish, production quantity, and required appearance.

Product organization should be checked at the same stage.

Dividers, slots, inserts, risers, or other internal features can help control product position, but they also affect machining and assembly. A physical sample is useful here because it allows the project team to check both product fit and branding before approving the tray for production.

How Is a Custom Acrylic Display Tray Manufactured?

The exact manufacturing process depends on the structure and finish, but a typical project moves through material preparation, cutting or machining, edge finishing, branding, assembly, sample approval, inspection, and mass production.

The important point is that these steps affect one another.

A dimensional problem created during cutting may show up later as an assembly problem. Poor edge preparation may affect the final appearance. A branding position that looks acceptable on one tray may become obviously inconsistent when many units are placed together.

Cutting and Machining

Production starts by turning the confirmed drawing into individual acrylic components.

Flat panels may be sized with a saw, while slots, openings, recesses, or more complex profiles may require CNC routing or laser cutting. The method depends on the geometry, acrylic thickness, and required edge condition.

Accuracy at this stage matters because even small differences between components can affect alignment during assembly.

For a tray with straight walls and a simple rectangular footprint, the construction may appear straightforward. But when several panels need to meet cleanly, consistent dimensions become more important than the complexity of the shape.

Edge Finishing, Branding and Assembly

After cutting or machining, exposed acrylic edges may need sanding and polishing to remove machining marks and achieve the required finish.
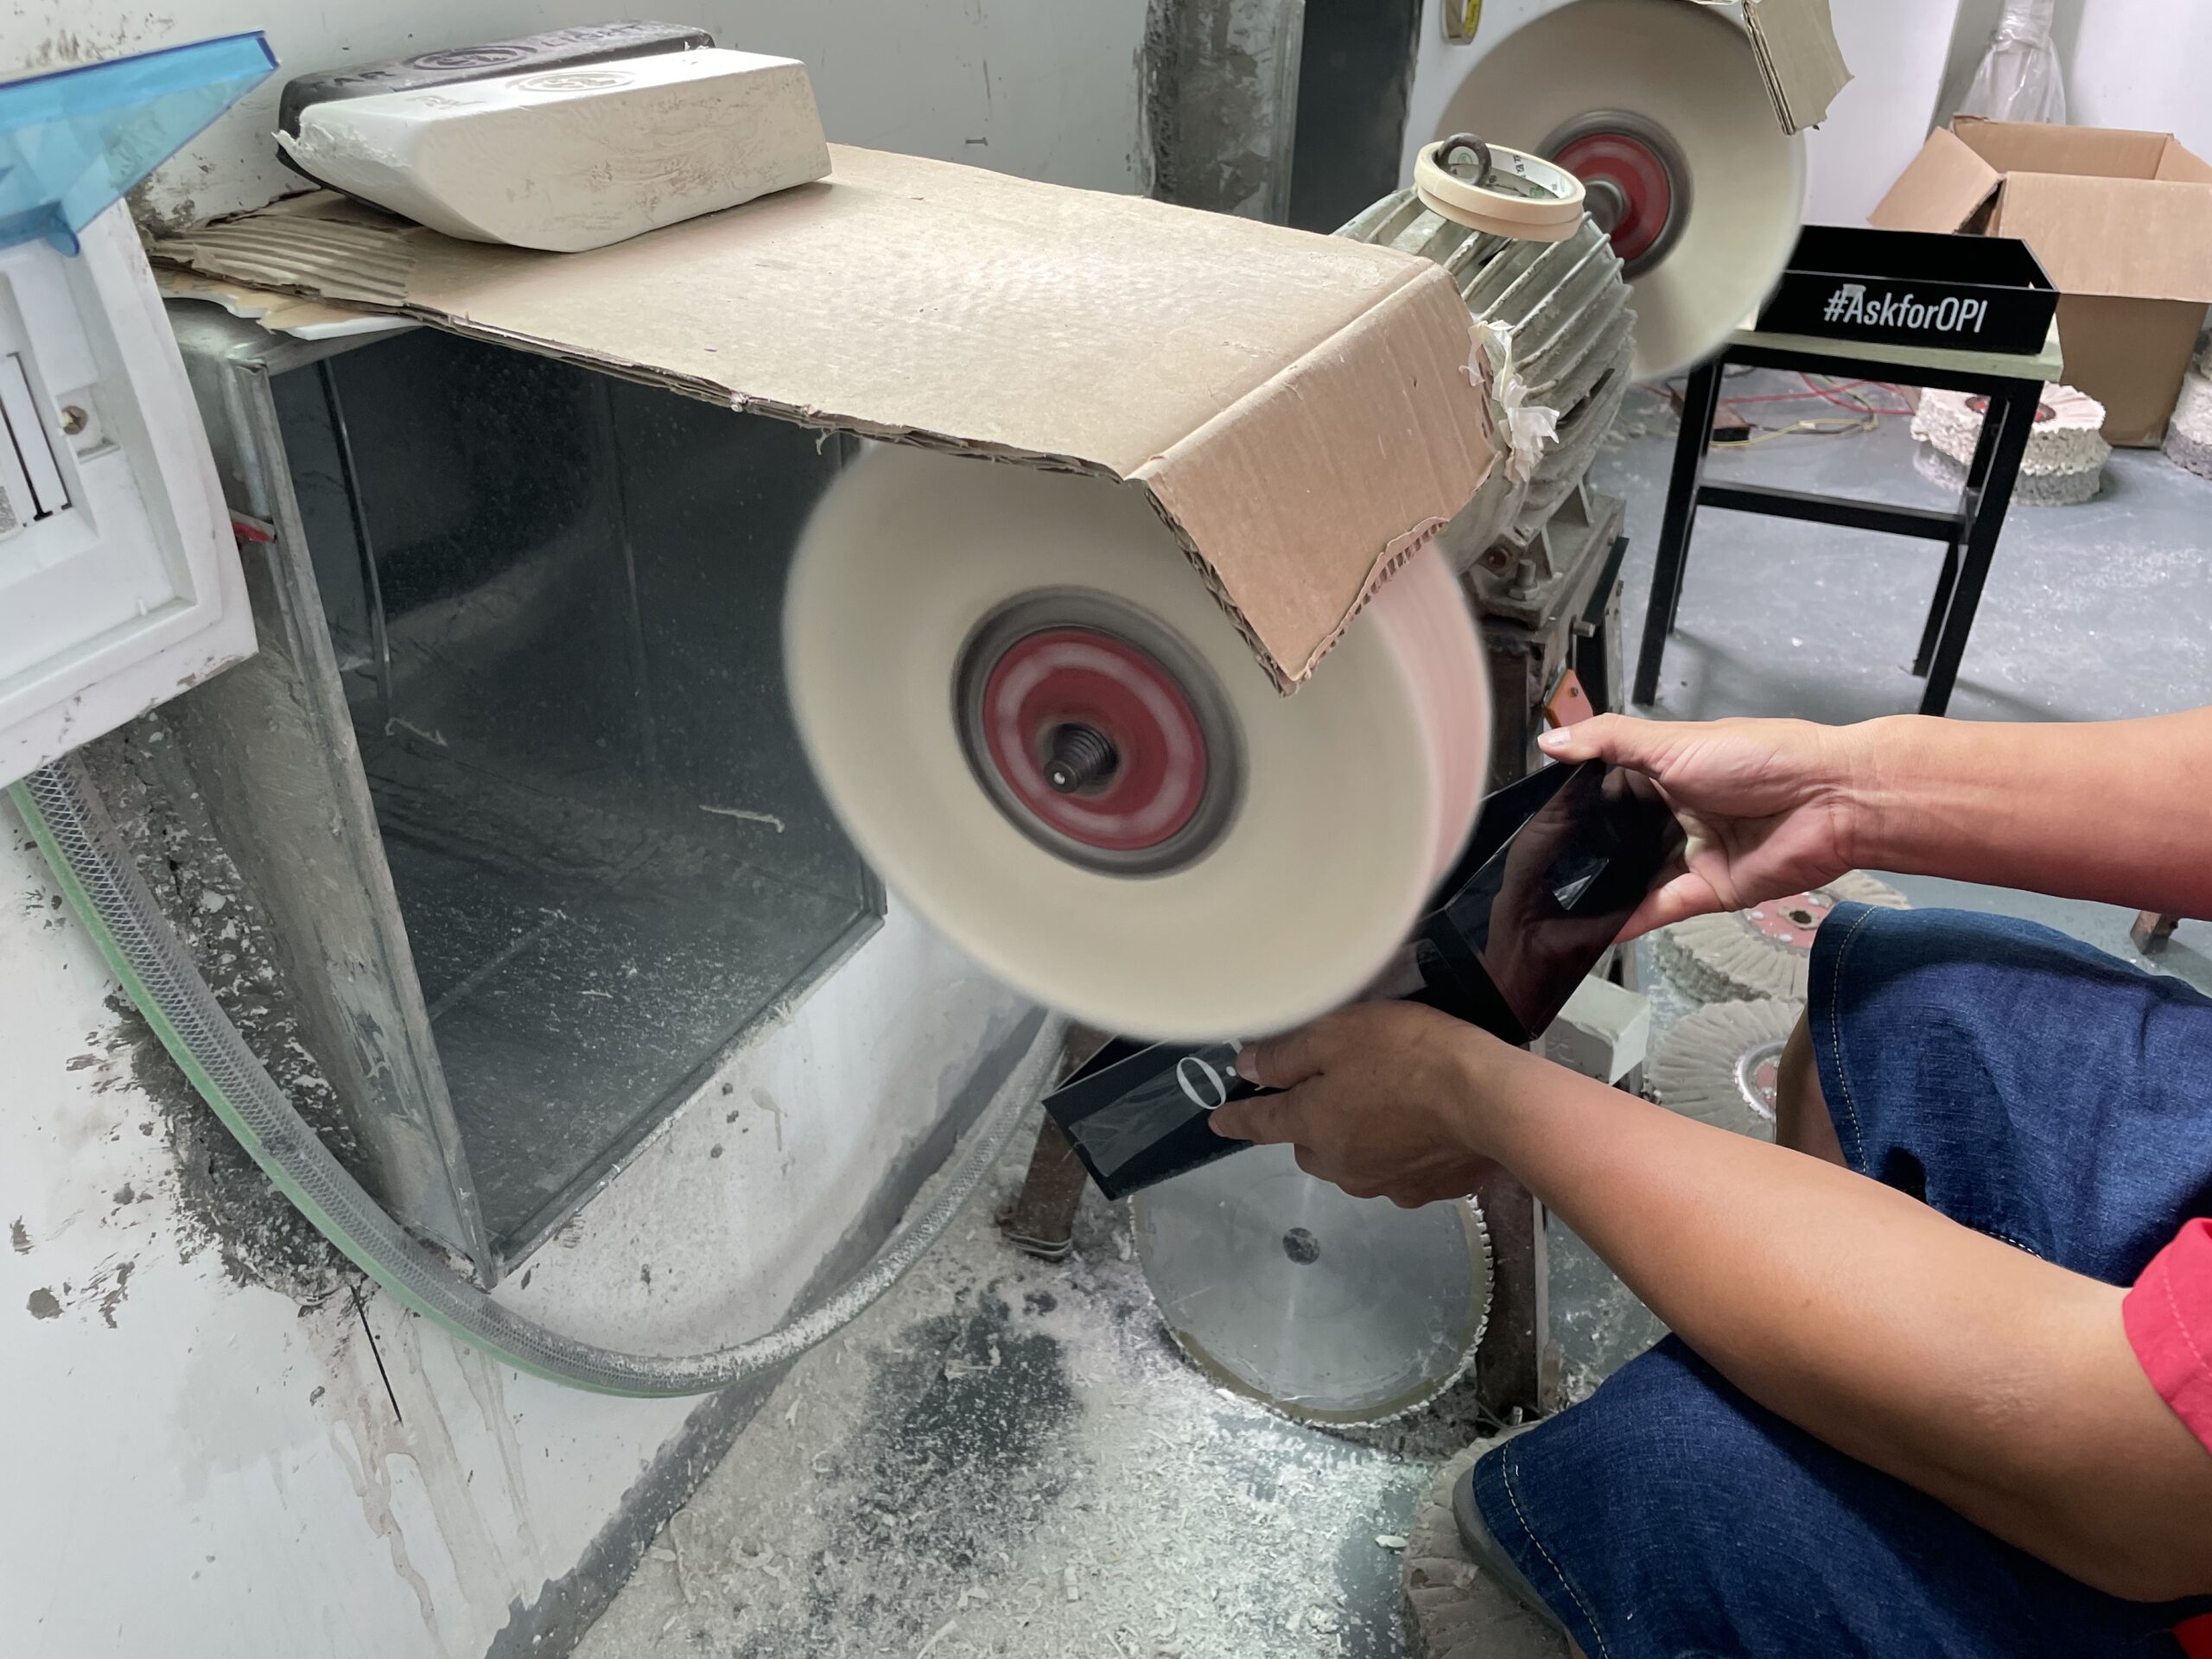
Worker polishing exposed edges on a glossy black acrylic component during production

This is one of those details that is easy to overlook in a rendering.

An exposed edge is part of the finished product. If different edges have noticeably different clarity, polish, or machining marks, the tray can look inconsistent even when the dimensions are correct.

Branding also needs to follow the approved artwork and position. Small positioning differences may not attract attention on one unit, but they become easier to see when finished trays are stacked or displayed side by side.
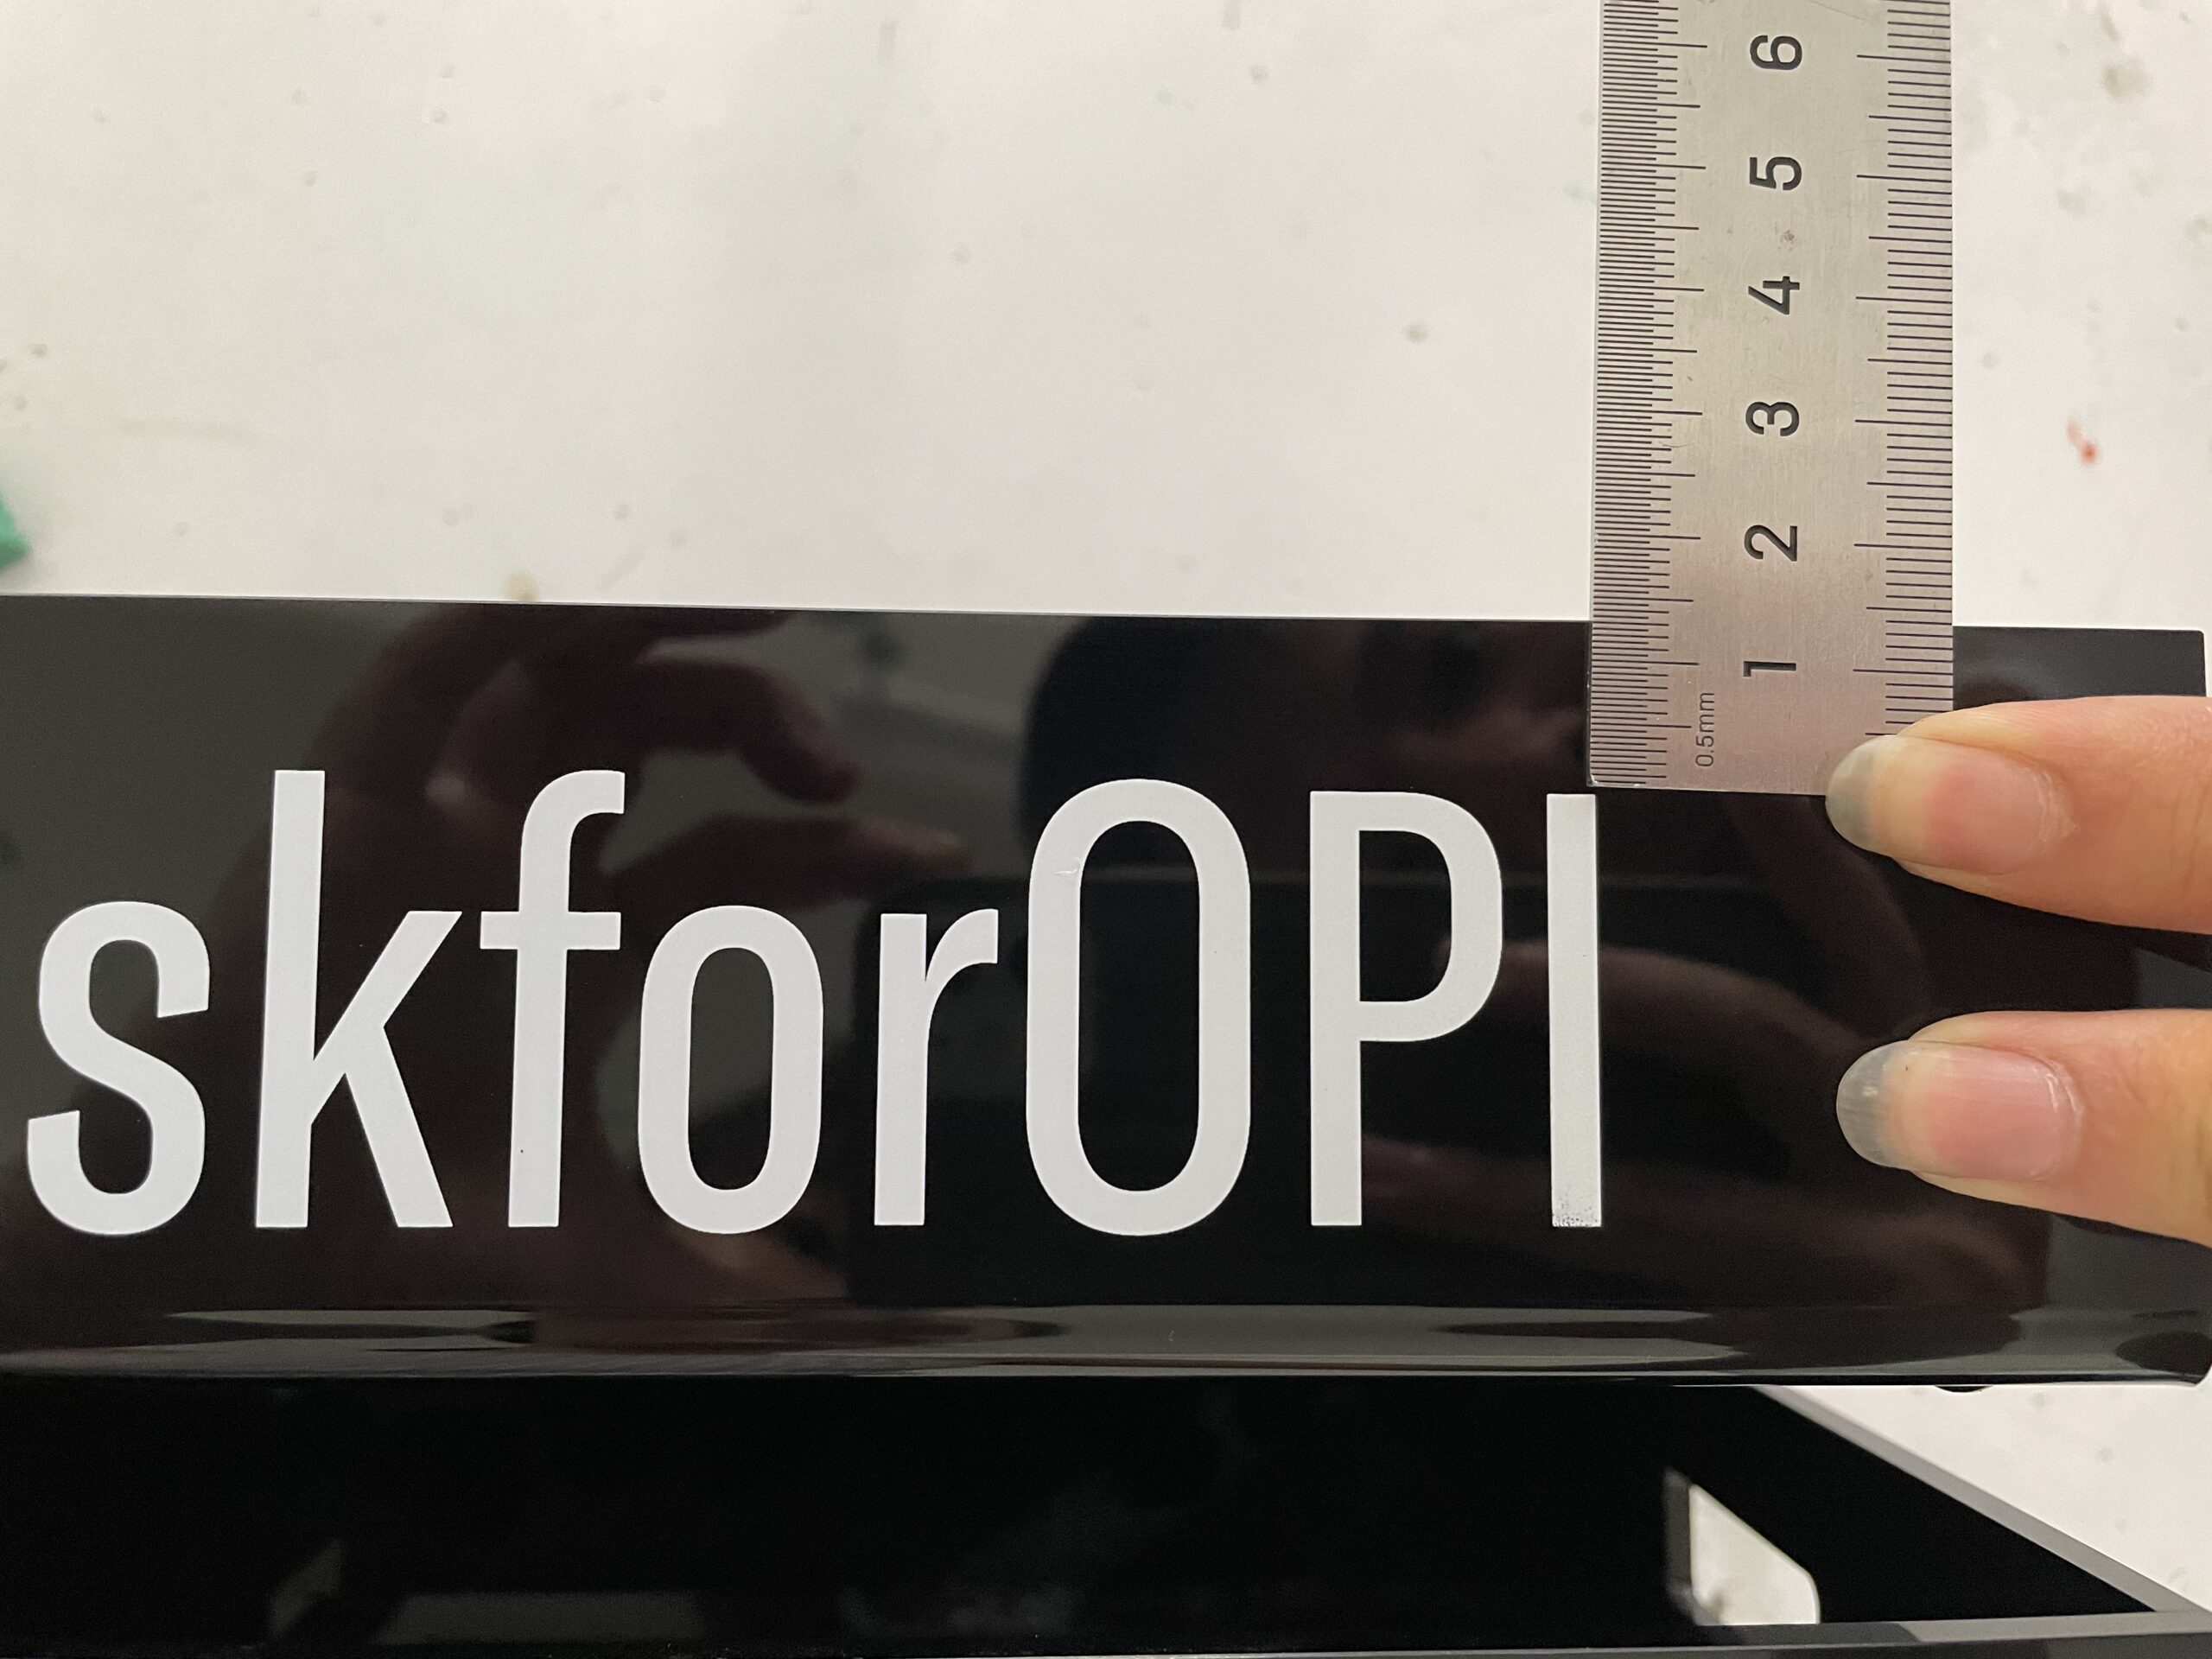
Measuring the position of white OPI branding on a glossy black acrylic panel

During assembly, the panels need to remain aligned while maintaining the required surface condition. On high-gloss acrylic, careless handling during this stage can create marks that are difficult to ignore later.

Inspection Before Mass Production

Before mass production, the finished sample should be checked against the approved requirements.

Typical inspection points include:

  • overall dimensions;
  • product fit;
  • acrylic color and surface condition;
  • exposed edge finish;
  • logo size and position;
  • panel alignment and joint quality;
  • overall appearance.

However, a good sample is only the starting point.

Once production quantities increase, the question changes from “Can this tray be made?” to “Can every tray stay close to the approved reference?”
Visual Merchandising Solutions

Transform your retail space with custom POP displays, window decorations, and luxury merchandising solutions. Get expert consultation and premium manufacturing services.

✓ 20+ Years Experience • ✓ Global Shipping • ✓ Custom Manufacturing
Visual Merchandising Solutions

That is where production control becomes more important.

Real Production Case: Glossy Black Acrylic Display Trays for OPI

The trays shown in this project were produced for OPI beauty retail merchandising.

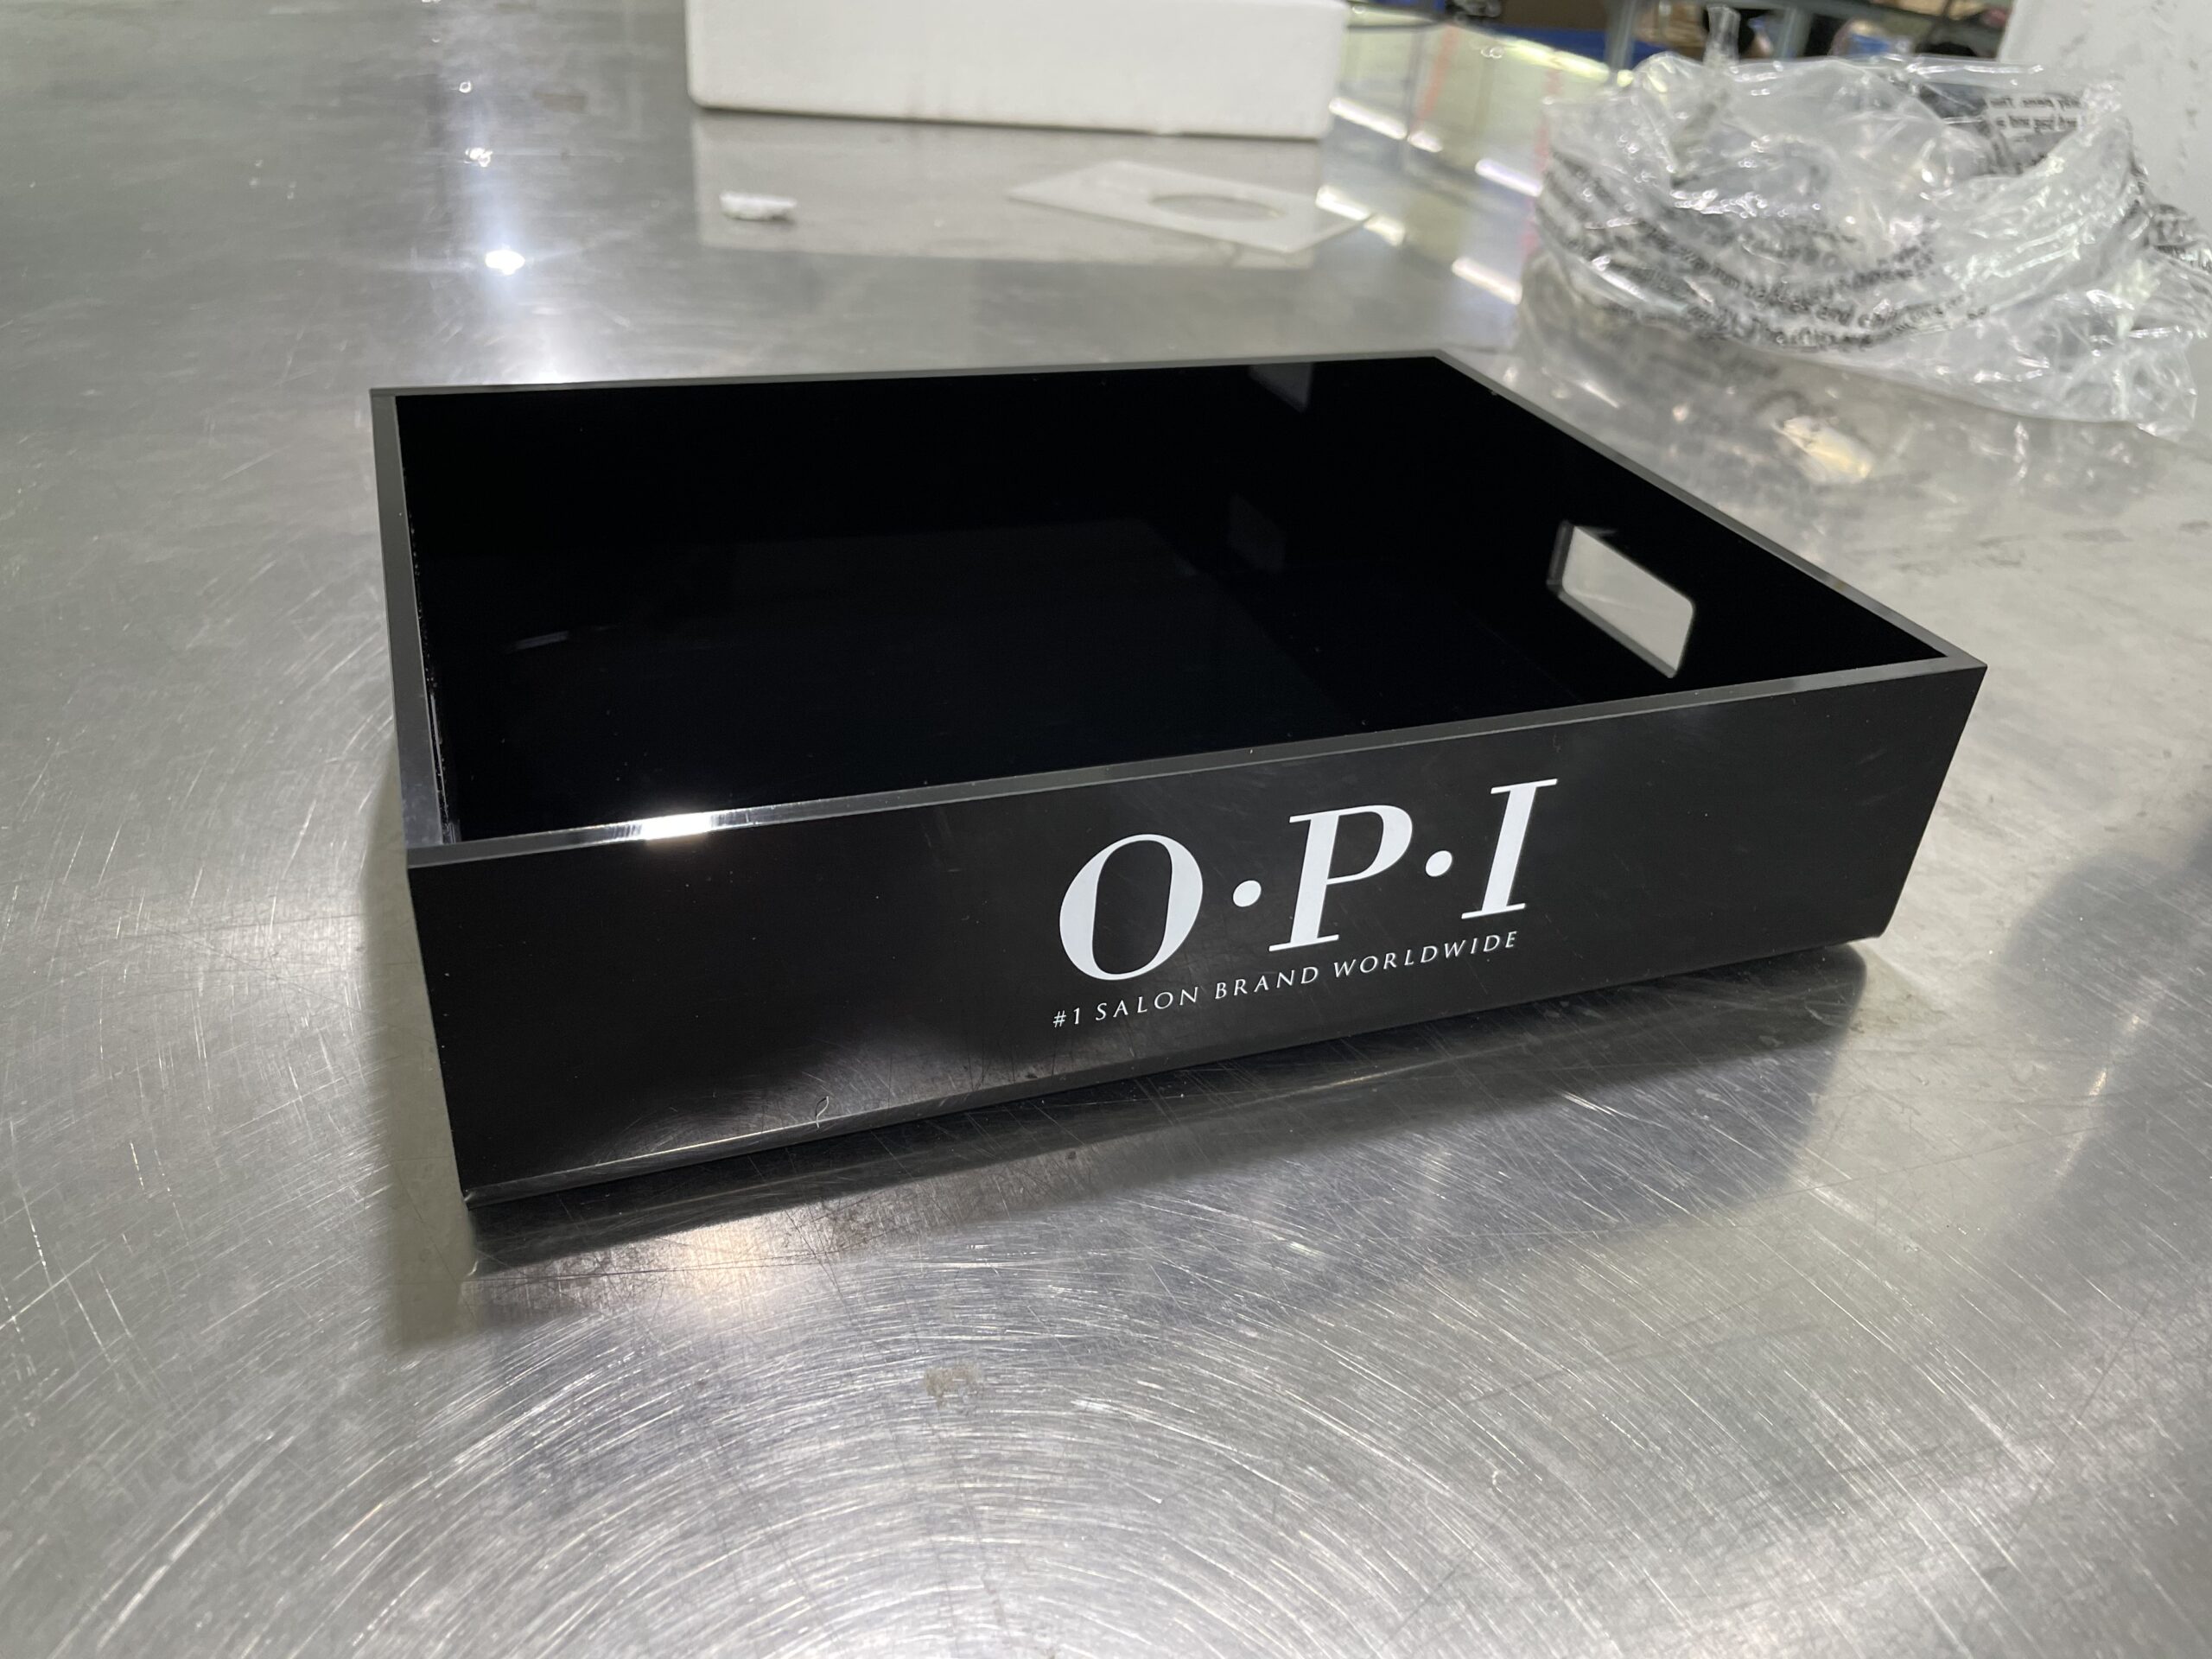
The finished unit uses glossy black acrylic, a shallow open structure, and high-contrast white branding. From a structural point of view, it is not a complicated display.

Custom glossy black acrylic display tray with white OPI branding for beauty retail merchandising

That simplicity is exactly why the finishing details stand out.

When there are few decorative elements to hide behind, the acrylic surface, edges, branding position, panel alignment, and overall consistency become a larger part of the final appearance.

Glossy Black Acrylic and Surface Finish Control

Glossy black acrylic gives the tray a strong, clean background and makes the white OPI graphics easy to see.

The trade-off is visibility of surface defects.

This does not mean black acrylic necessarily scratches more easily than other colors. The practical issue is that scratches, fingerprints, dust, rubbing marks, and polishing marks are easier to see against a dark glossy surface.

That changes how the trays need to be handled.

Surface condition needs attention during machining, edge finishing, assembly, inspection, movement between workstations, and packing. A tray can pass dimensional inspection and still be rejected visually if the finished surface has obvious marks.

For this kind of retail fixture, surface quality is therefore not one QC checkpoint at the end. It has to be maintained through the production process.

Why Edge Finishing Matters on a Simple Tray

The OPI tray uses straight acrylic panels with exposed upper edges.

These edges may look like a small detail in the drawing, but they sit directly next to the glossy front and side surfaces. Cutting or machining marks that remain visible on the exposed edge can therefore reduce the clean appearance of the finished tray.

Edge finishing is also a production-control issue.

When multiple components are cut, finished, and assembled repeatedly, the goal is not simply to make one edge look good. The finish needs to remain reasonably consistent from one tray to the next.

This is why edge condition should be included in the approved sample and production inspection rather than treated as a cosmetic correction after assembly.

Dimensional, Branding and Mass-Production Consistency

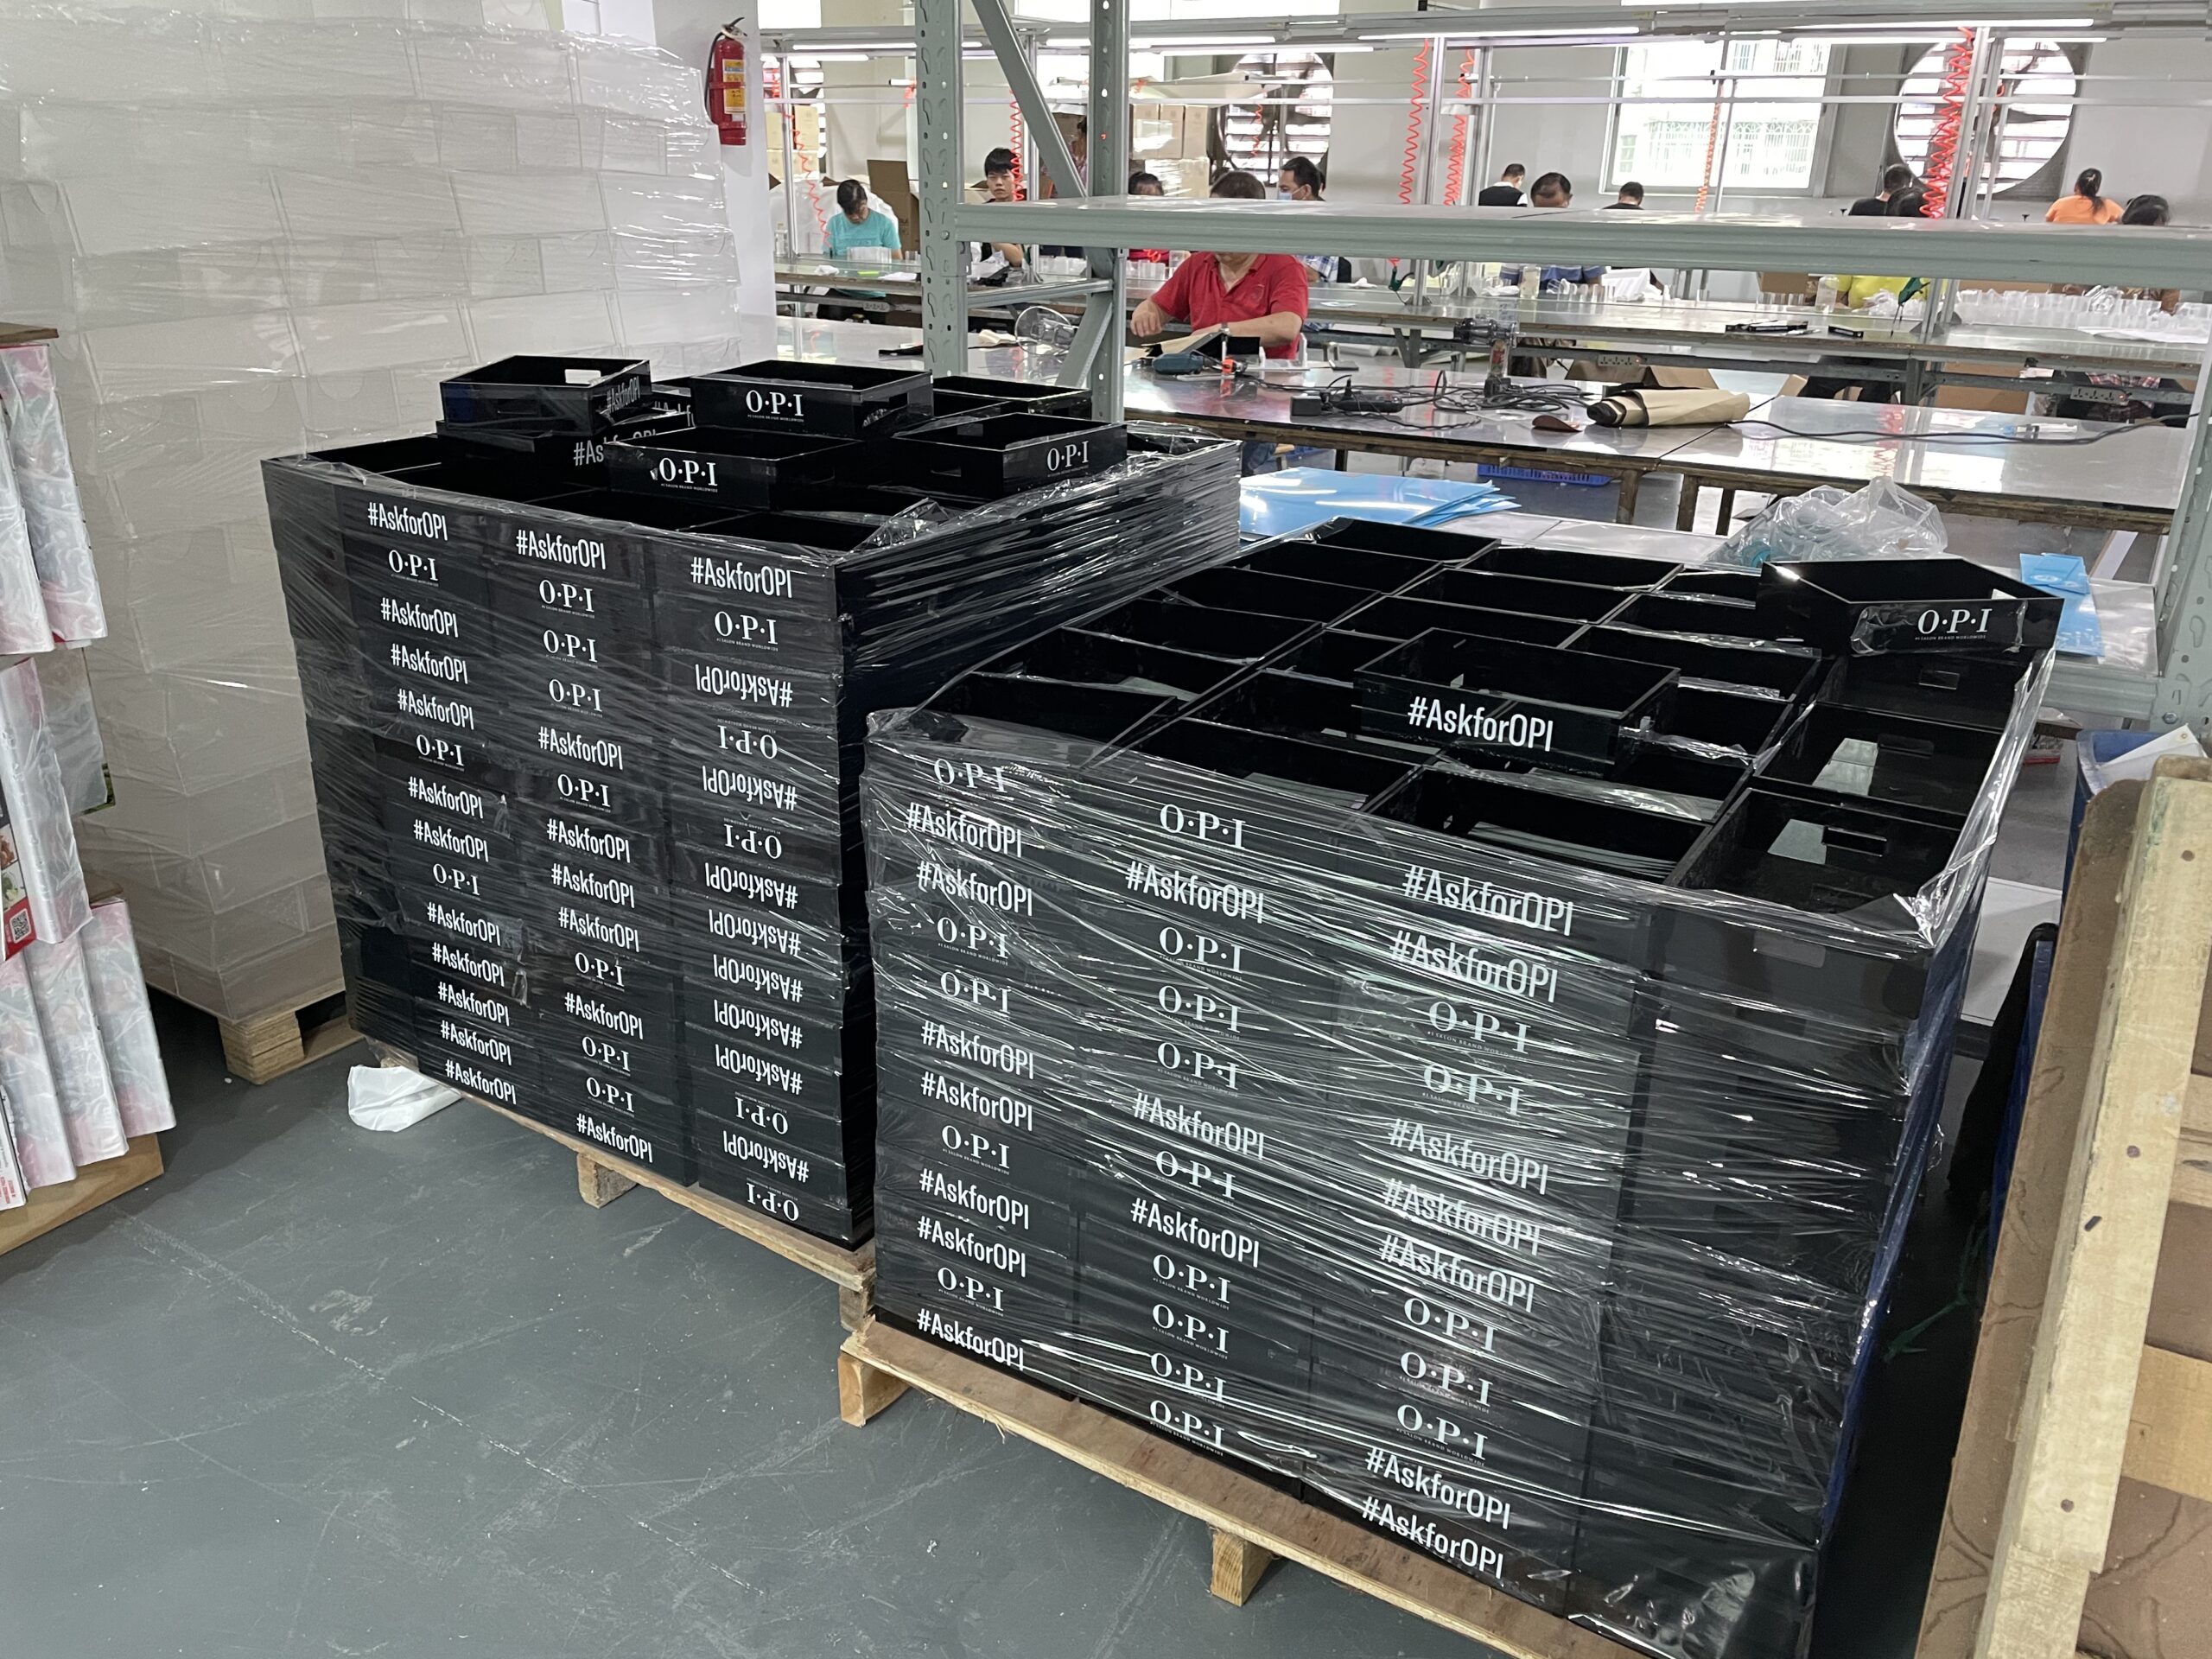
A finished sample may meet the approved requirements, but mass production introduces a different challenge: consistency.

Acrylic display tray mass production for OPI with finished units stacked and protected on pallets

During the production run, dimensions, edge condition, branding position, surface appearance, and assembly need to be checked against the approved reference.

This becomes particularly visible with the white graphics used on the black tray. A small shift may not look serious when one unit is inspected alone. Put many finished trays together, however, and differences in graphic position or alignment become much easier to see.

The same applies to tray dimensions and panel alignment.

For a retail rollout, the approved sample establishes the standard. Production control is what keeps the rest of the batch close to it.

Bulk Production, Protection and Packing

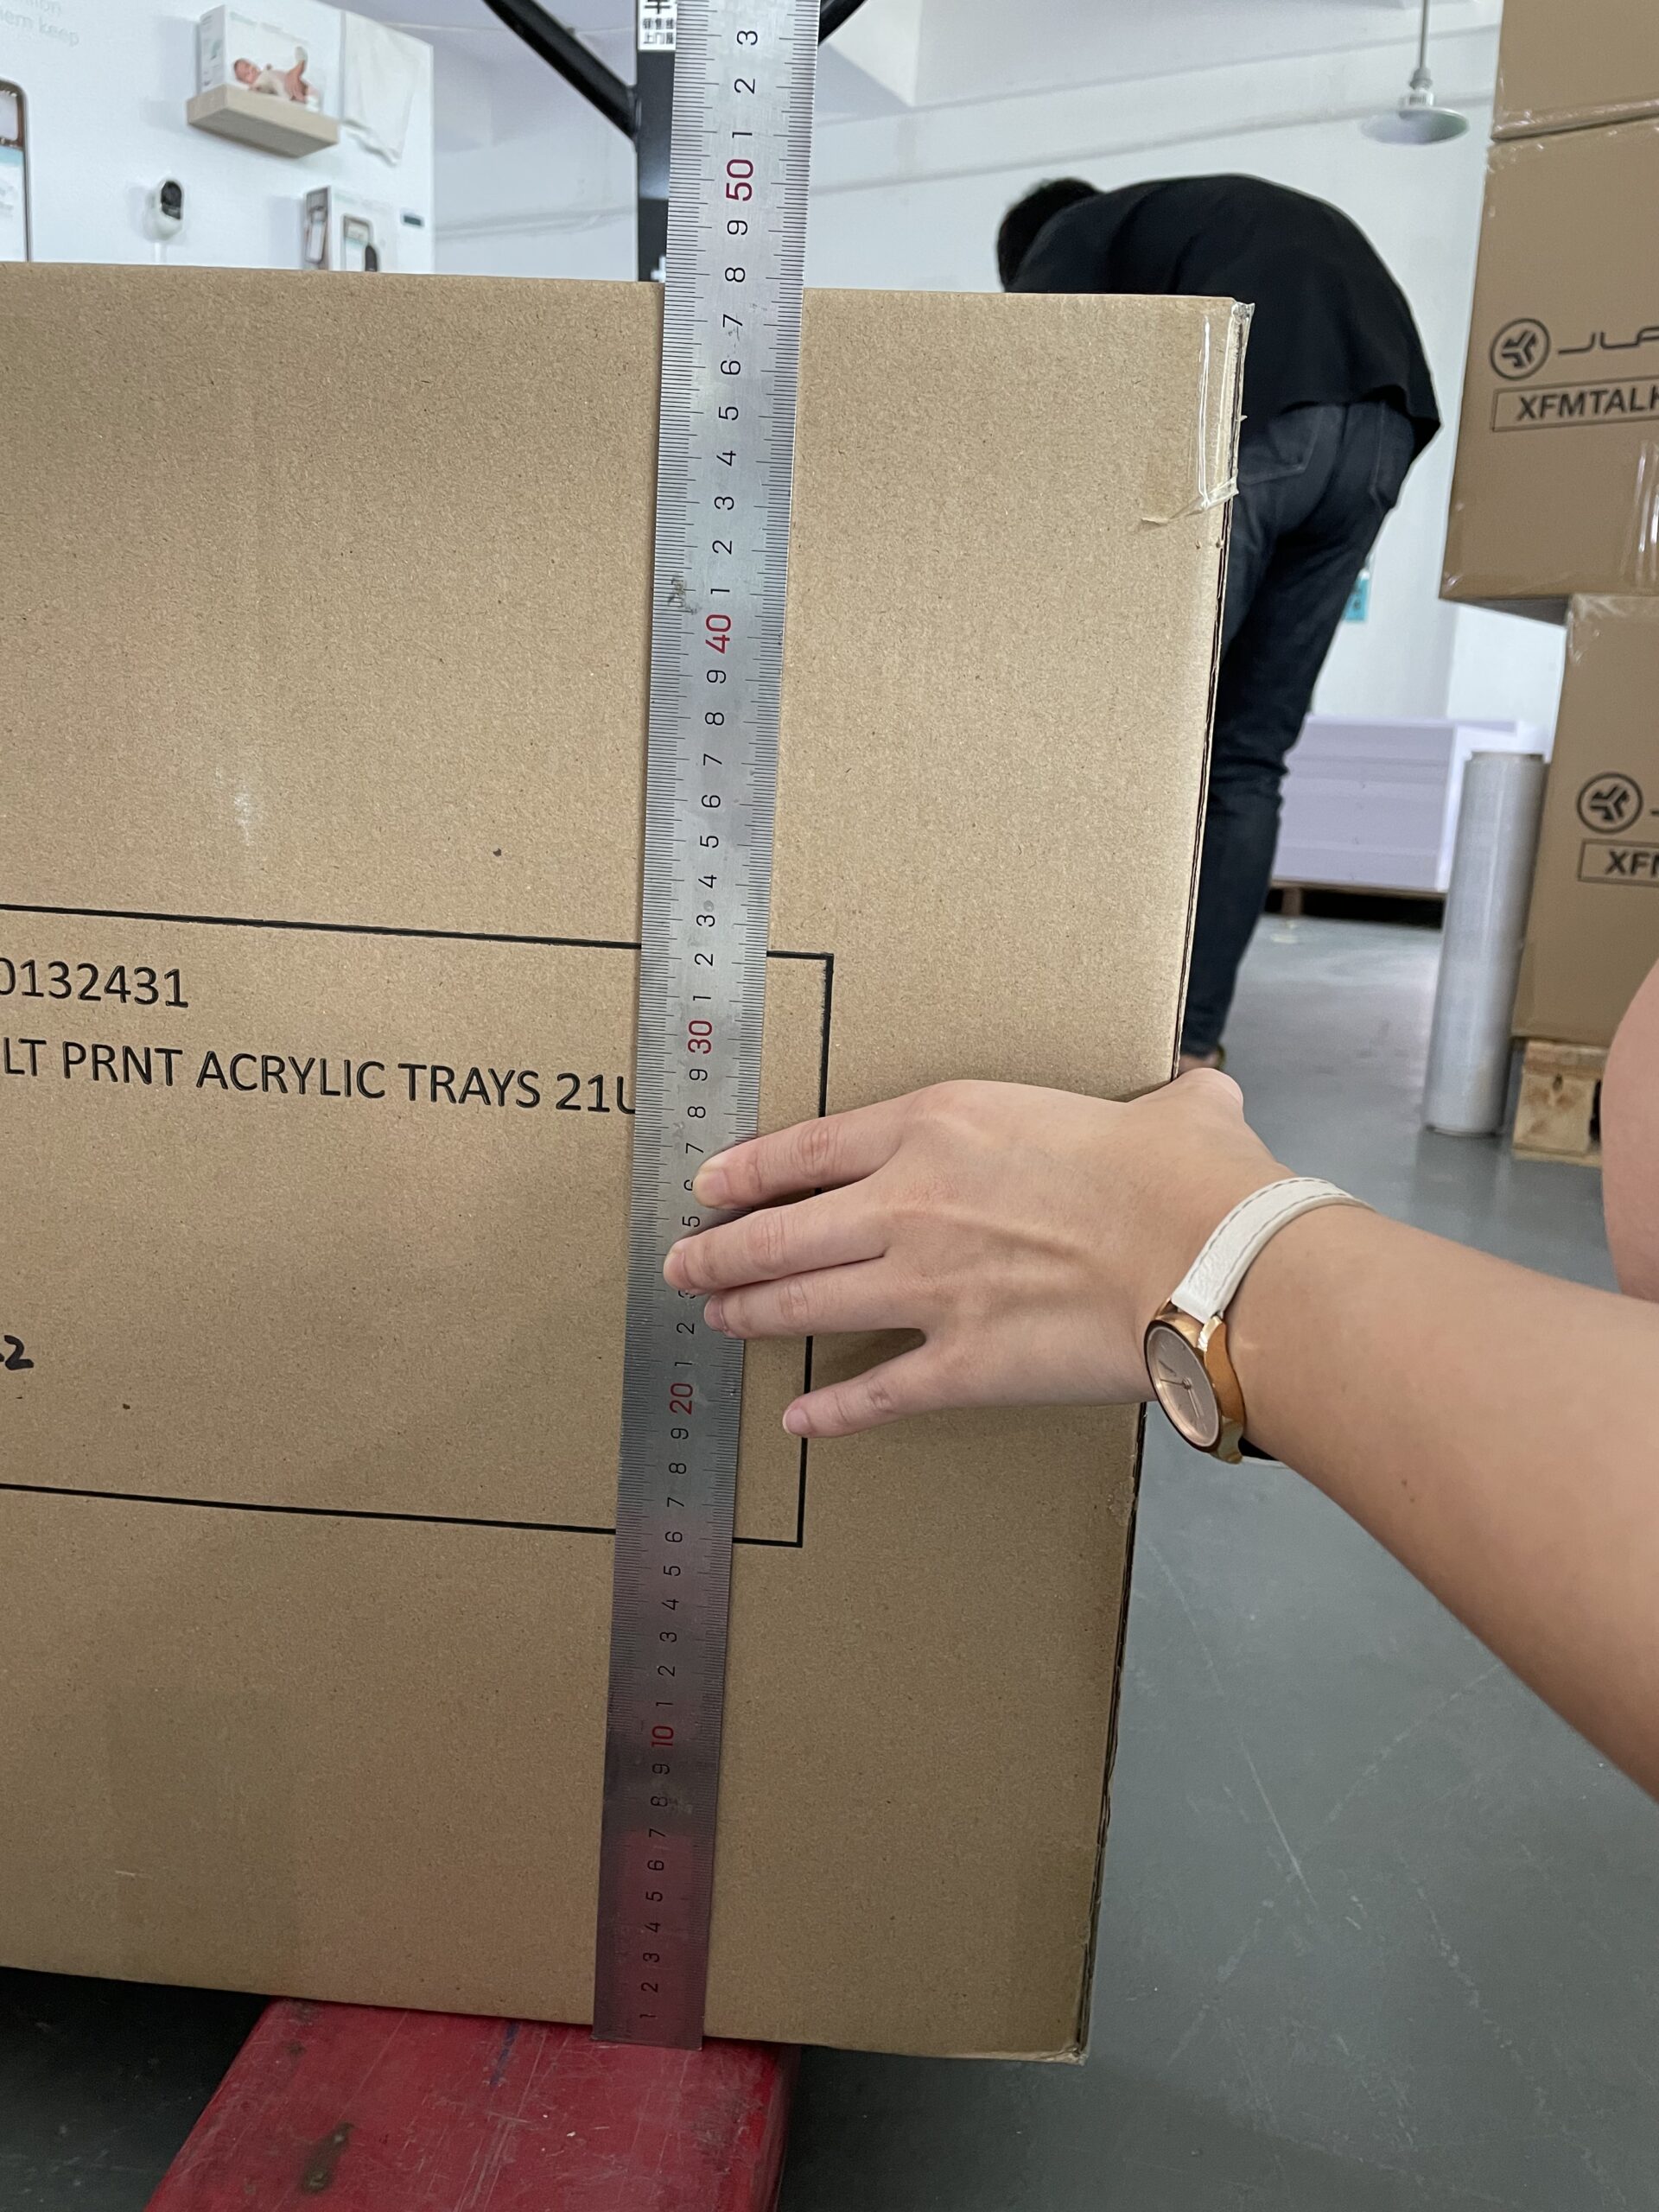
Once the trays are finished and inspected, they still have to survive handling and transportation.

This stage matters more with glossy acrylic because finished surfaces can rub against one another after they have already passed QC.

Individual protection, separation between finished surfaces, and controlled carton packing help reduce unnecessary contact before delivery. The packing method should therefore be considered together with the surface finish rather than after production is complete.

Factory worker checking outer carton dimensions with a metal ruler before shipment

Packaging is not only a logistics step; it is also part of protecting the finished surface.

What to Look for in an Acrylic Display Tray Manufacturer

Choosing a manufacturer is not only about comparing unit prices.

For a custom acrylic tray project, the supplier should first be able to understand the drawings, dimensions, artwork, product layout, finish requirements, and quantity, then translate those requirements into a repeatable production process.

A physical sample is useful before mass production because it allows your team to check the actual product fit, dimensions, acrylic finish, edge condition, branding, and overall appearance.

But also ask what happens after the sample is approved.

How are dimensions checked during the production run? How is logo positioning controlled? How are glossy surfaces handled between production stages? How are finished trays separated and protected before packing?

These questions matter because a good sample and a good production run are not the same thing.

If you already have drawings, product dimensions, artwork, reference images, a 3D file, or an existing sample, that is usually enough for a custom acrylic display manufacturer to begin reviewing manufacturability and quotation.

FAQs About Acrylic Display Trays

What is an acrylic display tray?

An acrylic display tray is a retail fixture used to organize and present products on counters, shelves, POS areas, and other merchandising surfaces. It can be customized in dimensions, acrylic thickness, color, finish, branding, dividers, inserts, and other product-organizing features.

What thickness should an acrylic display tray use?

There is no universal best thickness. The right acrylic thickness depends on the tray dimensions, unsupported span, product weight, structure, and required rigidity. Thickness should be considered together with the structure rather than selected on its own.

Can acrylic display trays be customized for cosmetics and nail polish?

Yes. Acrylic display trays can be customized around the dimensions, quantity, and arrangement of cosmetics, nail polish, skincare, perfume, jewelry, and other small retail products. Dividers, inserts, slots, risers, and branding can be added according to the merchandising requirement.

How can a logo be added to an acrylic display tray?

Common methods include screen printing, UV printing, vinyl graphics, engraving, and applied branding elements. The suitable process depends on the artwork, acrylic color and finish, quantity, durability requirement, and desired appearance.

For mass production, logo size and position should be confirmed against the approved artwork and sample before the full production run.

What affects the cost of a custom acrylic display tray?

There is no standard price for a custom acrylic display tray. Cost depends on size, acrylic thickness, structure, machining complexity, edge finishing, branding, order quantity, assembly, and packing requirements.

Even trays that look similar can have different production costs because their structure and finishing processes may be different. For a useful comparison, ask suppliers to quote against the same drawing, finish, quantity, and packing specification. This cost-driver logic is also consistent with Samtop's existing quotation guidance.

What information is needed for an acrylic display tray quotation?

For a more accurate quotation, provide:

  • tray dimensions or available retail footprint;
  • product dimensions and quantity;
  • required order quantity;
  • acrylic color and finish;
  • logo artwork;
  • drawings, 3D files, reference images, or an existing sample if available;
  • delivery destination;
  • required timeline;
  • packing requirements if already defined.

The more of these details are confirmed, the easier it is for the manufacturer to evaluate material use, manufacturing feasibility, production process, and cost.

Start Your Custom Acrylic Display Tray Project

If you already have a drawing, product layout, artwork, reference image, or existing sample, Samtop can help turn your approved concept into a production-ready acrylic display tray through prototyping, acrylic fabrication, branding, quality control, packing, and mass production.

Visit www.samtop.com to learn more about our custom retail display manufacturing capabilities or discuss your project with our team.

Bob

About Bob

Hi, I’m Bob, the funder of SamTop.com, Our company makes visual merchandising props, retail display stands and window display decoration for many years now, and the purpose of this article is to share with you the knowledge related to retail displays from a Chinese supplier’s perspective.

Connect: